Saw
Filing--A Beginner's Primer
The guide below has been prepared with the first time filer
in mind. The resulting work is a compilation of 25 years saw filing
experience, coupled with the study of various period works on
the topic. Most people think that sharpening a saw with a file
is a skill that is just too complicated to undertake. In reality
it is not, although there are some details that you must pay attention
to at all times. The satisfaction coming from taking a dirty saw
that you just bought at a flea market for $5, and then restoring
it to perfect working order can't be described. No matter how
many saws that I sharpen, I feel the same way when the sharp blade
slices through a piece of wood. More people should experience
this thrill first hand. It is with that thought in mind that I
present this treatise. It is by no means a complete and thorough
description of the topic. Something that detailed would not be
able to fit on this site. You should find the text below sufficiently
detailed to sharpen any saw that you have in your shop. Have fun
and good luck!
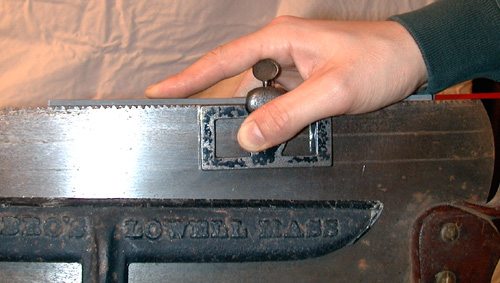
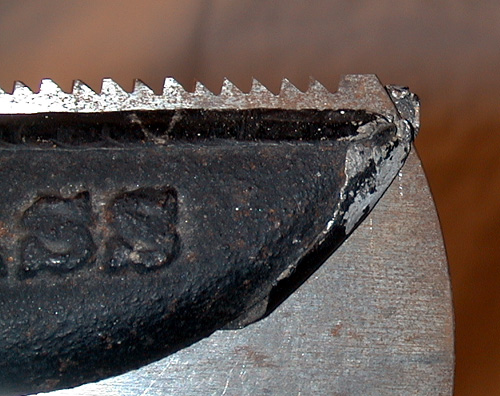
When to sharpen? There are many things that one should consider
when making a decision if a saw needs sharpened or not. First
and foremost, you should inspect the teeth. If the teeth are regular
and even, and "grab" the palm of your hand slightly
when you push against them, your saw probably is fine as it is.
By grab, I mean that if the teeth are sharp, they will snag the
skin of your hand and then release it. Don't do it so hard that
you cut yourself. You will immediately be able to tell with a
light touch if your saw is dull. If however, the teeth are uneven
and don't seem sharp to the touch, your saw will definitely need
filing before you will be able to do useful work with it. Below
are examples of what properly sharpened teeth will look like,
and those that need filing. Carefully inspect your saw and decide
what course you should take. The final test, however, is how the
saw cuts. If the saw takes a long time to work through a piece
of wood, won't follow a line or binds in the cut--your saw needs
sharpened and likely set.
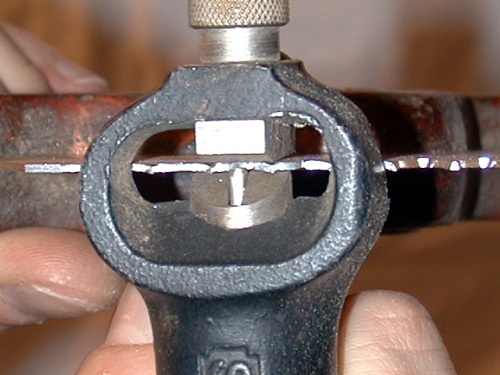
Selecting a Saw Vise
What do I need to sharpen my saw? Fortunately, the tools that
are required to sharpen a saw are easy to acquire and are not
very expensive to get your saw cutting right. The first thing
you will need is vise. The saw filing vice has only one job: To
hold the saw blade securely and at a comfortable height for filing.
The act of filing a thin piece of hardened steel causes a lot
of vibration. The saw vice dampens vibration and allows the file
to cut. If the saw blade vibrates, it makes it impossible for
the file to "bite" into the metal that it is trying
to sharpen. This causes the file to skitter across the surface
of the teeth, resulting in a dull file and dull teeth.
There are many different patents of saw filing vises that were
made in the past when saw filing was common. In general, you should
look for a vise that has no broken parts with accurately closing
jaws. Saw filing vises are very nice that have all their finish
and are like new. However, finding vises like this is very difficult.
Saw filing vises saw hard use, and were often stored where they
got rusty and abused. Do not be concerned if your vise is rusty.
As long as all the parts are present and the jaws close firmly
and lock in place, you have a vise that will do the job. If you
like, you can always clean your vise up and repaint it. Most saw
filing vises are not rare or collector's items. Some of the companies
that specialized in saw filing vises were Disston, Wentworth and
Stover. Any vise that meets the above criteria can be used. For
those who can't find a good vise, there is sometimes a selection
on this website. In addition, making a saw filing vise out of
wood is a relatively easy task. There are many plans which spell
out how to make a properly functioning vise.
Some Thoughts on Making a Saw Vise
There are some common attributes that you should consider if
you decide to make a saw filing vise. In general, most of these
vise plans work in a shoulder vise and are nothing more than two
pieces of wood that are hinged at the bottom. Both pieces have
stock removed inside the jaws to accommodate the thickness of
the blade. They also have the top of each half of the jaw beveled
to 45 degrees, so that when the vise is closed it is easier to
file the teeth. You should make the vise as long as you can. Ideally,
the vise should be as long as the saw that you intend to file.
The one advantage that a craftsman made wooden vise has over an
iron one is that the entire side of the saw can be sharpened without
moving it. In addition, the inside of the jaws should be slightly
hollow in the middle. By doing so, you will ensure that when tightened,
the entire length of the blade is firmly gripped.
What Size File to Use
The next thing that you need is the proper file for the job.
You should seek to buy the highest quality file that you can find.
Avoid "bargain" files that are made in India or China.
The teeth are not hard or durable enough to sharpen a quality
hand saw. While they may seem attractive due to price, they will
only waste your time and money. I use Nicholson
brand files which are available in the maintenance section
of this web site.
You should seek to use the right size file for the job. In
general, saw filing files common is four tapers: Regular, Slim,
Extra Slim and Double Extra Slim. There is a lot of mystique and
confusion about what size file to use for a certain size saw tooth.
The bottom line is that you should use the file which is not too
big or too small. You should be able to easily see the teeth when
you are filing. In addition, when each edge of the file is used,
there should be no significant over or underlap among the three
edges. If you use a file that is too small, you will use the same
middle section of each face, which will be dull right where you
need it to be the sharpest. Near the middle of each face is where
the cutting edge of the teeth is sharpened. If you use a file
that is too big you will not be able to see the teeth. Also, larger
files do not come to as sharp an edge as smaller files. If you
compare the edge of a 7" file with a 4" file, you will
see that the edge of the 7" file has almost a 1/32"
"flat" on the edge. Compare that to the edge saw of
the 4" file. It comes to almost a knife edge. It is no accident
that shorter files as used to file smaller teeth. If all this
in confusing, don't worry. Just use the files that are recommended
in the table below and you will be all set.
|
File Type |
PPI of Saw |
| 8" Regular Taper |
3-4.5
|
| 6" Regular Taper |
5-5.5 |
|
7" Slim Taper |
6,7 |
|
6" Slim Taper |
8 |
|
6" XSlim Taper |
9,10 |
|
6" 2XSlim Taper |
11-13
|
|
4" 2XSlim Taper |
13-20
|
Finally, many people make a big mistake when they buy a saw
file in thinking that it will last forever. You are only wasting
time and producing dull teeth if you try to extend the life of
a file. Each file has three cutting edges. The rule of thumb I
use is that it a saw is really dull requiring teeth to be reshaped
and filed, plan on only using one cutting edge per saw. If the
saw only need a light touch up, then you may be able to get two
saws sharpened per cutting edge. If your file makes a loud screeching
sound when you use it--it is telling you that it is dull and that
you should switch to a fresh edge. Saw files are so inexpensive,
that there is no reason to try to use a single file to sharpen
10 saws. Use the guidelines above, and you will get the maximum
benefit from each file. To remember which edges on a file are
used up, I lightly dress the dull edge of the file on the grinder,
removing the cutting teeth from the extreme edge. This will remind
you that edge is used up and prevents you from trying to use it
beyond its normal life span.
File Handles and A Place to File
The next thing that you will need is a proper handle for the
file that you are using. Do not attempt to file a saw grasping
the file by the bare tang. You risk stabbing your palm with the
tang if you do so. In addition, it causes the fingers of the hand
that are grasping the end of the file to become very fatigued.
If you have a lathe, you may enjoy making some handles to fit
the various files in your shop. I offer a very convenient high quality handle in the maintenance
section of the web site. It has a hardened die which actually
threads on to the soft file tang. This causes the file to be securely
gripped by the handle, providing maximum safety and comfort.
The last thing that you will need is a work area that is properly
lit and of the right height. You can't have enough light when
filing saws. However you choose to light your work area, you should
be careful not to causes glare on the teeth. By moving various
floodlights around the work area, you can find a combination that
is right for you. Finally, you should adjust the height of your
saw vise so that the angle that is formed by your upper arm and
forearm is more of less 90 degrees when you are actually filing
a saw. If the vise is too high or low, it will become tiring and
causes inefficient work. The time taken to properly set up you
filing area will make all the difference in whether you enjoy
the process of sharpening your saw, or whether you view it as
drudgery.
Different Types of Teeth
What are the differences between crosscut and rip teeth? There
are two basic types of saw teeth on modern western style handsaws.
By western, I mean saws that cut on the push stroke. Crosscut
teeth, as the name implies, are used to cut a piece of wood across
the grain. Rip teeth are used to cut a piece of wood along the
grain. We'll discuss each in turn.
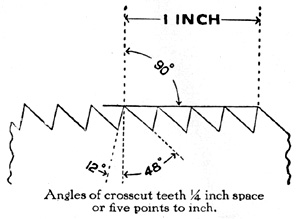
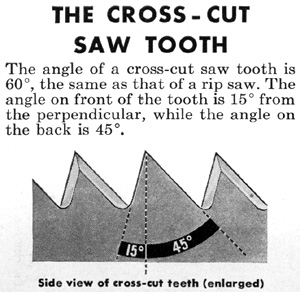 Crosscut
teeth are by far the most complex of the two types of saw teeth.
Crosscut teeth can be found in sizes from 5-16 points per inch
(ppi) with 7-10 being the most common. If you look at the diagrams
to the right, you will see that each crosscut tooth is a perfect
60 degree angle. It is no accident that all saw filing files are
60 degrees as well. There are several angles that you will have
to keep in mind when thinking about crosscut teeth. The first
is the rake angle. By rake, I am describing how much the cutting
edge of the saw tooth is sloped back from perpendicular. The most
common rake angle is 15 degrees. In general, the steeper the rake
angle, the more aggressive the saw will cut. However, saws with
steeper rake angles are also more difficult to start. I find that
anything from 12-15 degrees is best. I tend to file my saws closer
to 12 degrees, as I have no lack of experience in getting a saw
to start cutting. If you are a beginner, you may find that a 15
degree rake is more comfortable. As you gain experience, experiment
with different rake angles until you find one that you prefer.
Crosscut
teeth are by far the most complex of the two types of saw teeth.
Crosscut teeth can be found in sizes from 5-16 points per inch
(ppi) with 7-10 being the most common. If you look at the diagrams
to the right, you will see that each crosscut tooth is a perfect
60 degree angle. It is no accident that all saw filing files are
60 degrees as well. There are several angles that you will have
to keep in mind when thinking about crosscut teeth. The first
is the rake angle. By rake, I am describing how much the cutting
edge of the saw tooth is sloped back from perpendicular. The most
common rake angle is 15 degrees. In general, the steeper the rake
angle, the more aggressive the saw will cut. However, saws with
steeper rake angles are also more difficult to start. I find that
anything from 12-15 degrees is best. I tend to file my saws closer
to 12 degrees, as I have no lack of experience in getting a saw
to start cutting. If you are a beginner, you may find that a 15
degree rake is more comfortable. As you gain experience, experiment
with different rake angles until you find one that you prefer.
All About Fleam
The second angle that you will need to know about is called
the fleam or bevel angle. If you look closely at a properly files
crosscut tooth, you will discover that each tooth is shaped like
a lance on the edge. This is due to the fleam angles on each tooth
and is what makes crosscut style teeth more challenging to file.
To understand why fleam is important, it is necessary to understand
how a crosscut tooth actually works to cut wood.
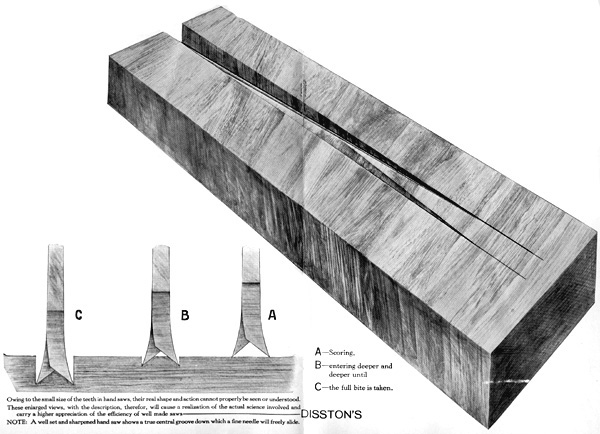 If you think about it, wood is
basically a bunch of fibers that are grouped together. These fibers
are what is referred to as the "grain" of the wood.
To cut them efficiently, the saw teeth act like a series of knives
which cut the fibers on either side of the blade. In doing so,
the teeth create a channel which is slightly wider than the width
of the saw blade. The tips of the crosscut teeth start the work
by scoring the wood fibers on either side of the blade. As the
cut gets deeper, the front edge of the teeth which are shaped
like the edges of a knife, actually pare away at the waste that
remains in the center of the cut. The result is saw dust, which
is carried out in the gullets of the saw teeth. The gullets are
the deep spaces between the cutting edges of the saw teeth. Examine
the illustrations to the right to understand the function of the
various parts of the cross cut tooth.
If you think about it, wood is
basically a bunch of fibers that are grouped together. These fibers
are what is referred to as the "grain" of the wood.
To cut them efficiently, the saw teeth act like a series of knives
which cut the fibers on either side of the blade. In doing so,
the teeth create a channel which is slightly wider than the width
of the saw blade. The tips of the crosscut teeth start the work
by scoring the wood fibers on either side of the blade. As the
cut gets deeper, the front edge of the teeth which are shaped
like the edges of a knife, actually pare away at the waste that
remains in the center of the cut. The result is saw dust, which
is carried out in the gullets of the saw teeth. The gullets are
the deep spaces between the cutting edges of the saw teeth. Examine
the illustrations to the right to understand the function of the
various parts of the cross cut tooth.
Practical Fleam Angles

 In the
illustrations to the left and right, the presence and absence
of fleam can be seen in dramatic fashion. To the left, we see
a typical section of crosscut teeth. Notice how each tooth comes
to a "point". Each point is a result of the tooth being
bevel filed from each direction. The beveling is what is called fleam
and makes a crosscut saw work. Since each crosscut tooth has fleam,
crosscut teeth, when viewed from the edge, as can be seen at the
left, appear as two rows of knives. It is possible, due to this
effect, to actually slide a needle between the two rows. This
is supposed to be a test of a properly filed and set crosscut
saw. In reality, even a poorly filed crosscut saw will pass this
test, as long as it is properly set and the teeth are of the same
height.
In the
illustrations to the left and right, the presence and absence
of fleam can be seen in dramatic fashion. To the left, we see
a typical section of crosscut teeth. Notice how each tooth comes
to a "point". Each point is a result of the tooth being
bevel filed from each direction. The beveling is what is called fleam
and makes a crosscut saw work. Since each crosscut tooth has fleam,
crosscut teeth, when viewed from the edge, as can be seen at the
left, appear as two rows of knives. It is possible, due to this
effect, to actually slide a needle between the two rows. This
is supposed to be a test of a properly filed and set crosscut
saw. In reality, even a poorly filed crosscut saw will pass this
test, as long as it is properly set and the teeth are of the same
height.
In the illustration at the right, we can see a typical section
of rip teeth. Note that each tooth is flat on the top, like individual
sets of chisels. Due to the absence of fleam, no "valley"
is present as in crosscut teeth.
Like anything, there are some compromises which determine what
fleam angle to use. For general use, 20 degrees is best. The higher
the fleam angle, the more delicate the edge of the saw tooth will
be. The more delicate the saw tooth, the quicker it will dull.
However, a steeper fleam angle, like 24 degrees, works great if
you work primarily in soft woods free of knots. The cut will be
very quick and the result smooth. For lower fleam angles, like
15 degrees, you will have an edge that is more durable, but producing
a finish that is rougher. In addition, the saw will be slightly
harder to push with a lower fleam angle. Finally, there is one
practical consideration to keep in mind when considering fleam
angle. Smaller teeth, 12 and up, are harder to file the higher
the fleam angle. Since they are so small to start with, not much
is gained by using a high fleam angle like 24 degrees. For ease
in filing, I use a fleam angle of 15 degrees on the smaller teeth
that I file.
Rip Tooth Geometry
Rip Teeth are the easiest type of saw teeth to file, since
they do not have any fleam. Rip teeth occur in pitches from 4-7
ppi on hand saws, and from 8-16 ppi on back saws. The most common
size of rip tooth for a handsaw is 5 1/2 points per inch. Rip
teeth are not as common on back saws that you see available for
sale, but in certain applications, such as cutting tenon cheeks
or dovetailing, they are invaluable.
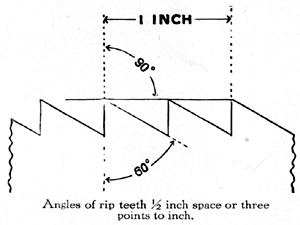
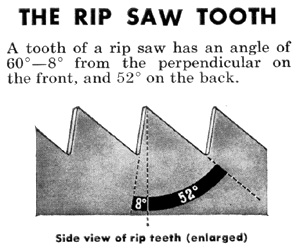 Rip Teeth,
like crosscut teeth are perfect 60 degree angles. However, unlike
crosscut teeth, rip teeth have a very steep rake angle, from 0
to 8 degrees. In the beginning of modern hand saw production,
all rip saws had teeth with a zero degree rake. Saws with a zero
degree rake (tooth edge perpendicular to the edge of the blade)
are very aggressive and quick cutting. However, they are challenging
to start a cut if you are not an accomplished sawyer. In the early
part of the 20th century, most of the saw makers began to relax
the rake angle on their rip saws to make them easier to start.
Disston choose an 8 degree rake angle as the best compromise between
ease of starting the cut and aggressiveness of cut. Since rip
teeth are large and easy to file, I recommend that unless you
are experienced, you start with a rake closer to 8 degrees, and
gradually reduce it until you find the best compromise between
ease of cut and speed of cut. I strike a compromise and file most
of my rip teeth at 4 degrees, finding it the most comfortable
for me.
Rip Teeth,
like crosscut teeth are perfect 60 degree angles. However, unlike
crosscut teeth, rip teeth have a very steep rake angle, from 0
to 8 degrees. In the beginning of modern hand saw production,
all rip saws had teeth with a zero degree rake. Saws with a zero
degree rake (tooth edge perpendicular to the edge of the blade)
are very aggressive and quick cutting. However, they are challenging
to start a cut if you are not an accomplished sawyer. In the early
part of the 20th century, most of the saw makers began to relax
the rake angle on their rip saws to make them easier to start.
Disston choose an 8 degree rake angle as the best compromise between
ease of starting the cut and aggressiveness of cut. Since rip
teeth are large and easy to file, I recommend that unless you
are experienced, you start with a rake closer to 8 degrees, and
gradually reduce it until you find the best compromise between
ease of cut and speed of cut. I strike a compromise and file most
of my rip teeth at 4 degrees, finding it the most comfortable
for me.
How Rip Teeth Cut
 Rip teeth act radically different
than cross cut teeth when they are cutting. Since they are flat
across the edge, they act similarly to a set of chisels levering
out the waste than knives paring it out. If you examine some rip
saw dust very closely, you will see that it looks like a bunch
of very small plane shavings. In the illustration at the right,
you can see the cutting action that rip teeth perform. This is
stylized and is to represent the cutting action of just one tooth.
But, you can imagine how all the teeth working together would
quickly cut a board along its length.
Rip teeth act radically different
than cross cut teeth when they are cutting. Since they are flat
across the edge, they act similarly to a set of chisels levering
out the waste than knives paring it out. If you examine some rip
saw dust very closely, you will see that it looks like a bunch
of very small plane shavings. In the illustration at the right,
you can see the cutting action that rip teeth perform. This is
stylized and is to represent the cutting action of just one tooth.
But, you can imagine how all the teeth working together would
quickly cut a board along its length.
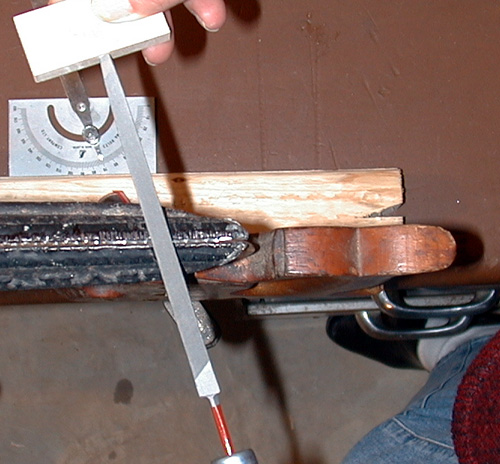
Making a Rake Alignment Jig
So, now that you understand the geometry and workings of the
two types of saw teeth, it's time to put that information to good
use. You should have a well lit area that is comfortable to you,
with a saw vise and file fitted with a proper handle. The most
challenging thing in filing saws is to maintain the same angles
on each and every tooth that you file. The hardest part in filing
is to keep the face of the file properly inclined to keep the
rake angle constant. With even a small change in the way you move
your wrist, you can increase or decrease the angle by as much
as 10 degrees. In saw filing, this is a huge and unacceptable
variation. The task is to ensure that the face of the file that
defines the rake angle be kept as constant as possible. Allowing
the file to follow the angle that is present on the tooth is a
recipe for disaster. With repeated filings, the angle will gradually
change to the point where the teeth need to be recut rather than
refiled.
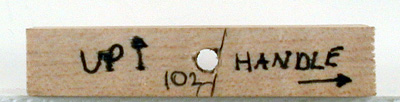 So, the primary concern is to
keep the file face constant with respect to the teeth. The easiest
way to do this is by making a simple jig out of piece of wood.
Take a thin piece of stock, about twice as thick as the diameter
at the non-handle end of the file. By diameter, I mean if you
scribed a circle that the triangular end of the file would just
fit into. Make the piece of wood about 1" wide and 1 ½"
long. Align the grain along the longer dimension. Use a dense
piece of wood, like hard maple. Next bore a hole into the edge
of each long side. If you are using a drill press, bore it all
the way through. Otherwise, bore from each side and meet in the
center. The hole should be about the same size as the pointed
end of the file. You will be driving the file into this hole,
and you want it to securely grip the wood and not slip. The next
step will require you to decide on a rake angle. Remember, that
good rake angles for crosscut saws are 12-15 degree. Rip saws
work best from 0 to 8 degrees. Take an adjustable protractor and
set it to the required rake angle. Adjust the beam so it is tilting
to the right of 90 degrees by the amount of rake that you have
decided to use. Align the bottom of the protractor with the bottom
of the block and so the beam just touches the right side of the
hole. Scribe a line with a sharp knife. Before going on, mark
the right side of the block with the words "Handle"
and add an arrow pointing to the right. In addition, mark the
very top of the jig with the word "Top".
This will ensure that you always use the right side of the jig
and have the top facing up. If you use the wrong side, you will
ruin the teeth on your saw.
So, the primary concern is to
keep the file face constant with respect to the teeth. The easiest
way to do this is by making a simple jig out of piece of wood.
Take a thin piece of stock, about twice as thick as the diameter
at the non-handle end of the file. By diameter, I mean if you
scribed a circle that the triangular end of the file would just
fit into. Make the piece of wood about 1" wide and 1 ½"
long. Align the grain along the longer dimension. Use a dense
piece of wood, like hard maple. Next bore a hole into the edge
of each long side. If you are using a drill press, bore it all
the way through. Otherwise, bore from each side and meet in the
center. The hole should be about the same size as the pointed
end of the file. You will be driving the file into this hole,
and you want it to securely grip the wood and not slip. The next
step will require you to decide on a rake angle. Remember, that
good rake angles for crosscut saws are 12-15 degree. Rip saws
work best from 0 to 8 degrees. Take an adjustable protractor and
set it to the required rake angle. Adjust the beam so it is tilting
to the right of 90 degrees by the amount of rake that you have
decided to use. Align the bottom of the protractor with the bottom
of the block and so the beam just touches the right side of the
hole. Scribe a line with a sharp knife. Before going on, mark
the right side of the block with the words "Handle"
and add an arrow pointing to the right. In addition, mark the
very top of the jig with the word "Top".
This will ensure that you always use the right side of the jig
and have the top facing up. If you use the wrong side, you will
ruin the teeth on your saw.
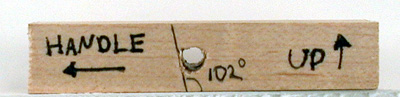 Now, flip the block around to
the other side, tilt the beam of the protractor an equal amount
in the other direction. Position the beam so it just touches the
left side of the hole and scribe a line with a sharp knife. When
you are done, if you sight through the hole, the lines you scribed
should both be tilting the same way when viewed from the same
side, not crossing. As before, write the word "Handle"
on the left side of the hole, with an arrow pointing to the left.
While you are at it, make as many guides as you think you will
need for various size files and rake angles.
Now, flip the block around to
the other side, tilt the beam of the protractor an equal amount
in the other direction. Position the beam so it just touches the
left side of the hole and scribe a line with a sharp knife. When
you are done, if you sight through the hole, the lines you scribed
should both be tilting the same way when viewed from the same
side, not crossing. As before, write the word "Handle"
on the left side of the hole, with an arrow pointing to the left.
While you are at it, make as many guides as you think you will
need for various size files and rake angles.
At this point we are ready to start filing. In general there
are 4 steps that might need to be done based on how bad you saw
is filed to start with. We'll discuss each in turn.
Jointing
 When a saw is very poorly filed,
the teeth become different heights. When this happens, not all
the teeth actually cut wood, which is less than optimum. By jointing
a saw, we adjust all the teeth to the same height. To do this,
place your saw in your saw vise so that about 2" of blade
extends above the jaws. To joint the teeth, you will need a 10"
smooth cut mill file. There are various old and new jointers that
were made to do this job, but if you don't have one, don't worry.
The job is so simple, you don't really need one. Take the file
and lay it on the saw teeth and the heel end of the saw. Grasp
the file with both hands, using your forefingers as a guide on
each side of the blade. Keeping the file parallel to the floor,
rub the file once across the entire length of the blade. If the
blade is breasted (slight curve), follow the curve. Now carefully
inspect the teeth. If the saw is in proper order, each tooth should
have a tiny flat right at the top of the tooth. If some teeth
have flats, and others don't, take another swipe. Continue until
all the teeth have been leveled to the same height. If you have
one or two broken teeth, DO NOT joint the saw until these teeth
have flats on the top. Any saw will work just fine with a few
teeth missing. As you repeatedly joint and sharpen your saw, these
teeth will gradually emerge. If after a few swipes of the file,
it is obvious that your saw is badly out of whack, you should
consider having new teeth cut into your saw by a sharpening shop.
If no shops are near you and you need this work done, please visit our website where we offer professional saw doctoring services.
When a saw is very poorly filed,
the teeth become different heights. When this happens, not all
the teeth actually cut wood, which is less than optimum. By jointing
a saw, we adjust all the teeth to the same height. To do this,
place your saw in your saw vise so that about 2" of blade
extends above the jaws. To joint the teeth, you will need a 10"
smooth cut mill file. There are various old and new jointers that
were made to do this job, but if you don't have one, don't worry.
The job is so simple, you don't really need one. Take the file
and lay it on the saw teeth and the heel end of the saw. Grasp
the file with both hands, using your forefingers as a guide on
each side of the blade. Keeping the file parallel to the floor,
rub the file once across the entire length of the blade. If the
blade is breasted (slight curve), follow the curve. Now carefully
inspect the teeth. If the saw is in proper order, each tooth should
have a tiny flat right at the top of the tooth. If some teeth
have flats, and others don't, take another swipe. Continue until
all the teeth have been leveled to the same height. If you have
one or two broken teeth, DO NOT joint the saw until these teeth
have flats on the top. Any saw will work just fine with a few
teeth missing. As you repeatedly joint and sharpen your saw, these
teeth will gradually emerge. If after a few swipes of the file,
it is obvious that your saw is badly out of whack, you should
consider having new teeth cut into your saw by a sharpening shop.
If no shops are near you and you need this work done, please visit our website where we offer professional saw doctoring services.
Shaping
 Now it is time to closely inspect
the teeth. You should look to see if the rake angle of the teeth
match the angle that you have decided on. In addition, look to
see if some teeth have much bigger flats than others. If the rake
angle is really far off, or some teeth have much larger flats
than others, you will need to reshape the teeth on your saw. Place
your saw in the vise so the gullets of the teeth clear the jaws
by about 3/32" of an inch. Put the saw in the vise so the
handle faces the right and the toe of the saw faces the left.
Fit your file with a proper handle. Next insert the tip of the
file in the alignment jig that you made to go with that file.
Find the side that has the line that tilts to the right. Insert
the end of the file in the hole so that one of the flat sides
of the file is parallel to the scribed line. This will ensure
that you maintain the proper rake angle.
Now it is time to closely inspect
the teeth. You should look to see if the rake angle of the teeth
match the angle that you have decided on. In addition, look to
see if some teeth have much bigger flats than others. If the rake
angle is really far off, or some teeth have much larger flats
than others, you will need to reshape the teeth on your saw. Place
your saw in the vise so the gullets of the teeth clear the jaws
by about 3/32" of an inch. Put the saw in the vise so the
handle faces the right and the toe of the saw faces the left.
Fit your file with a proper handle. Next insert the tip of the
file in the alignment jig that you made to go with that file.
Find the side that has the line that tilts to the right. Insert
the end of the file in the hole so that one of the flat sides
of the file is parallel to the scribed line. This will ensure
that you maintain the proper rake angle.
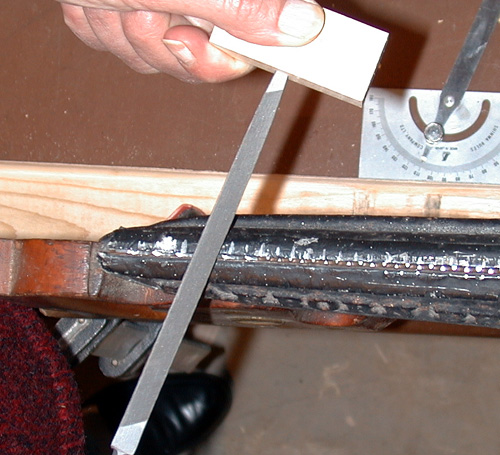
When reshaping the teeth, you should strive to make all the
teeth the proper height and with a consistent rake angle. As can
be seen at the right, I like to start at the heel and of the saw
and work to the left. There are only two things that you have
to remember in this operation. The first is that you need to keep
the alignment jig parallel to the top of the saw blade at all
times. By doing so, you ensure that you have a uniform rake angle.
Since the block is much wider than the tip of the file, this is
relatively easy to do. The second is that you need to look at
each pair of teeth as you file, and slightly press the file toward
the tooth with the larger flat. For instance, you will start in
the first gullet between the first two teeth. If the flats on
each tooth are the same size, press the file straight down and
push forward while keeping the alignment jig parallel to the blade.
You should take as many passes with the file as you need to reduce
the flat on each tooth by half. You will get the next half when
you move over one tooth. If the flat on one side is much larger
than the adjacent flat, press the file slightly toward the larger
flat while pushing the file forward. The idea is to cut much more
off the tooth that is more out of shape, than the one that is
nearly full height. Remember to keep the alignment jig parallel
to the top of the saw, take full even strokes and use the entire
length of the file. Continue to work to your left until you have
to reposition the saw in the vise.
 Keep working until you have adjusted
each tooth. As you can see at the picture to the right, the first
five teeth (from the heel of the saw) are now properly shaped
with a consistent 12 degree rake. They are also all the same height
and size. Compare those with the teeth to the left. They are of
various sizes, each with a different amount of flatness on top
of each tooth.
Keep working until you have adjusted
each tooth. As you can see at the picture to the right, the first
five teeth (from the heel of the saw) are now properly shaped
with a consistent 12 degree rake. They are also all the same height
and size. Compare those with the teeth to the left. They are of
various sizes, each with a different amount of flatness on top
of each tooth.
If the saw is severely out of joint (hey-that's where that
saying comes from), you may have to joint a second time and reshape
the teeth over again. If you do, don't worry, you are learning
valuable skills that will make it easier and easier to file any
saw. When you are done with this step, take a pass with the jointing
file and put just a small flat on the top of each tooth to get ready for the filing step.
Setting
 At this point, some people like
to set the saw. I prefer to do it after the filing step. To learn
more about setting, see my previous article by clicking here.
If you are looking for a saw set, we have a good selection
in the maintenance section. We like the Stanley 42X saw set although they are hard to find and in high demand. If you see none for sale, check back often as we are constantly sourcing them. If the saw is in order and did not
require much reshaping of the teeth, you may not need to set at
all. Most saws have too much set, so by filing some of it away,
your saw may be just right. Evaluate the saw by using the guidelines
in my setting article. I like to set the saw after it has been
filed to ensure that just the right amount is applied. However,
you will need at least a little set to be able to properly file
your saw. If your saw has been recut, or has had all the set removed
by reshaping, take the time to put just a little in now. You should
set the teeth the same way that they were set before. That is,
don't try to bend a tooth the other way once it has already been
set the opposite way. Doing so usually results in breaking the saw teeth that you try this on.
At this point, some people like
to set the saw. I prefer to do it after the filing step. To learn
more about setting, see my previous article by clicking here.
If you are looking for a saw set, we have a good selection
in the maintenance section. We like the Stanley 42X saw set although they are hard to find and in high demand. If you see none for sale, check back often as we are constantly sourcing them. If the saw is in order and did not
require much reshaping of the teeth, you may not need to set at
all. Most saws have too much set, so by filing some of it away,
your saw may be just right. Evaluate the saw by using the guidelines
in my setting article. I like to set the saw after it has been
filed to ensure that just the right amount is applied. However,
you will need at least a little set to be able to properly file
your saw. If your saw has been recut, or has had all the set removed
by reshaping, take the time to put just a little in now. You should
set the teeth the same way that they were set before. That is,
don't try to bend a tooth the other way once it has already been
set the opposite way. Doing so usually results in breaking the saw teeth that you try this on.
Filing
This is the most complicated part about sharpening a saw. If
you had to extensively reshape your saw's teeth, you almost certainly
have all the confidence and enthusiasm you need to make it a success.
Position the saw in the vise as before, with the handle to the
right. If you had to extensively reshape your saws teeth, remove
the file from the alignment block, and use a fresh edge. If the
file has done a lot of cutting, it will be no good for the final
filing step. Since the alignment block is determining the rake
angle, the only other thing that you have to keep in mind is the
fleam angle. If the saw is a rip, the fleam angle is zero and
you will file the saw straight across. If it is a crosscut saw,
you will need to angle the file to establish the fleam. Again,
you will want this to be as consistent as possible. It is not
as critical as the rake angle, but you should make every effort
to make it as uniform as you can. For all around cross cutting,
I like to use a fleam angle of 20 degrees. To remind you of this
angle, you can do several things. Some people actually make a
jig which consists of a ¾" by ¾" square
piece of stock. In the center, saw a slot which is 25 degrees
to the right of perpendicular. Saw to a depth of about ¼".
Flip the stick over, and file a slot 20 degrees to the left of
perpendicular. Finally, place the jig on the saw blade. If the
handle is to the left, the fleam jig should point in the direction
of the toe. This is very important. If you don't want to go to
the trouble, some people just lay a ruler on the bench behind
the saw defining the proper fleam angle. Use whichever method
is easiest for you.
Finally, we are ready to start to file the teeth. I have done
some considerable research on filing saws and have blended that
with my own practical experience. There is one important thing
that you have to remember when filing either a rip or a crosscut
saw. That is, you want to always file toward the toe of
the saw. This may seem like a trivial matter, but it is
very important. It is much more important in filing a crosscut
saw, but it also makes a difference with rip saws as well. I didn't
used to think so, but have changed my mind after further study
and experimentation.
Why you ask? The answer is simple. Files cut better on the
tooth that is bent away from you than they do on the tooth that
is bent toward you. If you start on the handle end of the saw,
and work toward the toe, you will be filing the back of one tooth
that is bent toward you and the front of the tooth that is bent
away from you at the same time. Remember, I said that a file cuts
much better on teeth that are bent away from you. By placing the
handle to the right and filing toward the toe, you will ensure
that the best finish is produced on the front of the tooth, and
the poorer finish on the back. Since all western saws work on
the push stroke, you want to make sure that the front of the tooth
is as keen as it can be. The back matters little- the only important
thing is that it meets with the front to form a sharp point. Since
a crosscut saw works partly by planing the edge of the cut, the
front of the tooth does the majority of the work. On a rip saw,
the effect is less important, but by maintaining the same approach,
and only filing every other tooth, the front of each tooth will
get the same treatment as in a cross cut saw. Confused? Don't
be. Just make sure that you always file toward the toe of the
saw.
OK, place your fleam jig on the saw so that it points toward
the toe if you are using one. Starting at the handle end of the
saw, which should be on the right. Make sure you use the side
of the rake alignment jig that points to the handle toward the
right. Place the file in the first gullet that the tooth to
the right is bent away from you and the
tooth to the left is bent toward you.
This may not be the first gullet on the saw, it could be the second.
If you look at the cutting edge from above, you will be able to
easily tell which is which. This is why it is important to have
at least a little set in the saw, so you can keep track of where
you are. So, at this point, the tip of the file is in a gullet.
You are starting at the handle end and the tooth on the right
side of the file is bent away from you, and the tooth on the left
side of the file is bent toward you. If you are filing a crosscut
saw, the file will be angled to establish the fleam angle. Align
the file to be parallel to the fleam guide that you are using.
Also keep the file alignment block parallel to the top of the
saw. Sound like just too much to keep track of? The first couple
times around, it will be. All I can offer is to think before you
file each tooth, and after about a dozen teeth, you won't have
to think about it so much and it will become less stressful.
 At this point, all the teeth
should have flats on the tips which are the same width, so you
won't need to compensate as much as you did when you were shaping
the teeth. Making sure that the file is properly aligned, push
the file forward. If you are filing a cross cut saw, the saw will
most likely make a high pitched shriek. Don't be alarmed. This
is normal. The reason is that the tooth that is bent toward you
is vibrating. It is for this reason that it is important to make
sure that is the back of one of the teeth not the front. You can
reduce the vibration by making sure that the saw is as low in
the vise as possible, but high enough that you won't file into
the vise jaws. As in shaping, you should strive to reduce the
flat on each tooth by one half. Depending of the size of the tooth,
you may only need to take one pass per gullet. Once you've reduced
the top of each tooth you are filing by half, you have sharpened
the front of one tooth and the back of another. Move to the left,
skipping one gullet. Since all saws have teeth that have an alternating
set, you need to skip a tooth. Don't worry, when you are done
you will flip the saw around and file those as well. As you file,
you will realize that you have to bias the file slightly to the
left toward the tooth that is bent toward you. Remember, the tooth
that is bent away from you files much more easily than the one
that is bent toward you. If you don't compensate for this effect,
you will end up with an effect I call, "Big Tooth, Little
Tooth".
At this point, all the teeth
should have flats on the tips which are the same width, so you
won't need to compensate as much as you did when you were shaping
the teeth. Making sure that the file is properly aligned, push
the file forward. If you are filing a cross cut saw, the saw will
most likely make a high pitched shriek. Don't be alarmed. This
is normal. The reason is that the tooth that is bent toward you
is vibrating. It is for this reason that it is important to make
sure that is the back of one of the teeth not the front. You can
reduce the vibration by making sure that the saw is as low in
the vise as possible, but high enough that you won't file into
the vise jaws. As in shaping, you should strive to reduce the
flat on each tooth by one half. Depending of the size of the tooth,
you may only need to take one pass per gullet. Once you've reduced
the top of each tooth you are filing by half, you have sharpened
the front of one tooth and the back of another. Move to the left,
skipping one gullet. Since all saws have teeth that have an alternating
set, you need to skip a tooth. Don't worry, when you are done
you will flip the saw around and file those as well. As you file,
you will realize that you have to bias the file slightly to the
left toward the tooth that is bent toward you. Remember, the tooth
that is bent away from you files much more easily than the one
that is bent toward you. If you don't compensate for this effect,
you will end up with an effect I call, "Big Tooth, Little
Tooth".
Continue filing every other tooth, and work toward the toe
of the saw. As you go, slide the fleam jig along if you are sharpening
a crosscut saw. Remember to keep the top of the file alignment
jig parallel to the top of the saw, bias the file toward the tooth
that is bent toward you and take full even strokes with the file.
Since you are only removing a small amount of metal to establish
the fleam, you will probably not need to use more than one file
stroke per gullet to get the tooth sharp. You should inspect the
teeth as you go to ensure that the leading edge of the tooth is
beveled right down to the edge. Otherwise, there will be a flat
spot there left from the tooth reshaping. The leading edge has
to come to a sharp edge as much as the top has to come to a point.
Again, if you are filing a rip saw, you will not have to worry
about this.
 Flip the saw around, this time
with the handle facing the left. Remove the file from the file
alignment jig, flip it over and use the other side. Remember to
make the cutting edge that you are using on the file parallel
with the scribed line on the jig. Flip the fleam angle jig over,
and place it on the saw. It should still point away from the handle
and toward the toe of the saw. As before, you will sharpen toward
to toe of the saw. You will sharpen every other tooth as before,
biasing the file toward the tooth that is bent toward you. The
only difference is that the tooth that is bent away from you will
be on the left, and the tooth that is bent toward you is on the
right. Continue along the saw, making sure that all the jigs are
properly aligned, and that you bring each tooth to a complete
point. Once you have done half a dozen teeth, check the saw for
sharpness. If it is sharp, it should "grab" the skin
of you palm. Also ensure that the leading edge of each tooth is
completely beveled to a sharp edge. Continue along, repositioning
the saw in the vise as required.
Flip the saw around, this time
with the handle facing the left. Remove the file from the file
alignment jig, flip it over and use the other side. Remember to
make the cutting edge that you are using on the file parallel
with the scribed line on the jig. Flip the fleam angle jig over,
and place it on the saw. It should still point away from the handle
and toward the toe of the saw. As before, you will sharpen toward
to toe of the saw. You will sharpen every other tooth as before,
biasing the file toward the tooth that is bent toward you. The
only difference is that the tooth that is bent away from you will
be on the left, and the tooth that is bent toward you is on the
right. Continue along the saw, making sure that all the jigs are
properly aligned, and that you bring each tooth to a complete
point. Once you have done half a dozen teeth, check the saw for
sharpness. If it is sharp, it should "grab" the skin
of you palm. Also ensure that the leading edge of each tooth is
completely beveled to a sharp edge. Continue along, repositioning
the saw in the vise as required.
Finished!
 When you have completely finished
filing both sides of the saw, all the teeth should be nice and
uniform. If you filed a rip saw, all the teeth will appear to
be the same size. However, if you were filing a crosscut saw,
you will notice that the teeth appear to be different sizes. In
the partially filed saw at the left, you will notice that the
first, third, fifth, seventh and ninth tooth (from the left) all
appear to be slightly larger than the tooth to their immediate
right. Don't worry, it is merely an illusion caused by the effect
of fleam. Since you are looking at the backs of some teeth (non-fleam
side) and the fronts of others (fleam side), the teeth appear
to be different sizes. However, if you hold it up to the light,
you will notice that once you negate the effects of fleam, the
teeth are the same size.
When you have completely finished
filing both sides of the saw, all the teeth should be nice and
uniform. If you filed a rip saw, all the teeth will appear to
be the same size. However, if you were filing a crosscut saw,
you will notice that the teeth appear to be different sizes. In
the partially filed saw at the left, you will notice that the
first, third, fifth, seventh and ninth tooth (from the left) all
appear to be slightly larger than the tooth to their immediate
right. Don't worry, it is merely an illusion caused by the effect
of fleam. Since you are looking at the backs of some teeth (non-fleam
side) and the fronts of others (fleam side), the teeth appear
to be different sizes. However, if you hold it up to the light,
you will notice that once you negate the effects of fleam, the
teeth are the same size.
Congratulations! You have completely sharpened the entire saw.
You are on the road to learning a skill that most think is too
hard or too complicated to master. Inspect each tooth. They should
all come to a complete point and be all the same height. The final
thing that you need to do is to lightly dress each side of the
saw with a fine oil stone. I prefer a medium India. Do not allow
it to contact the point of the teeth. Rub it along the side of
the saw, removing the filing burrs as you go. This is an important
step. It is most easily done by laying the saw flat on a table
and placing the stone flat on the blade with the edge overhanging
the teeth. Use a small amount of oil and rub lightly two or three
times the length of the blade on each side.
Test Cutting
The final step is to see how it cuts. Take a square and mark
a piece of wood with the proper type of cut for the saw you have
just filed. Draw back slightly to start the cut. Since the saw
is very sharp, it will be harder to start than it will be after
it has been used for a while. Once the cut is started, take long
full strokes the entire length of the saw blade. If the saw is
properly filed and set, the saw should slice through the cut with
a minimum of effort. If the saw rattles as the toe comes out of
the cut, the saw has too much set. Continue to stone the edges
and equal amount until the rattle disappears. In extreme cases,
you may have to lightly peen each tooth to remove some of the
set. This is the main reason I like to apply the set after I'm
done filing. You ensure that you apply only what you need to make
the saw cut properly. The saw should follow the line with a minimum
of correction. If the saw drifts from the line, you have one of
two problems (maybe both if you are really unlucky). Either the
saw has more set on one side than the other, or due to improper
filing, the teeth on one side are taller than those on the other.
First sight down the edge of the blade. If the teeth are different
heights, you will be able to see two ridges, one lower than the
other. The only cure for this is to refile the saw. However, more
often than not, it is purely due to one side being overset. Stone
the side of the saw again that is on the side of the drift. That
is, if it is drifting to the left, crossing the line you are following,
stone that side of the saw. Also, saws sometimes cut unevenly
if some of the burr remains from filing. Make sure that it is
all removed by stoning. Once the final tuning of you saw is complete,
it will cut flawlessly.
I hope that this treatise will serve as an adequate guide to
enable you to learn the art of saw filing. It is a skill learned
with patience and attention to detail. If you have those two qualities,
with proper practice, you will be able to sharpen any saw that
you find in the shop.
Sources Used:
Bassler, F.M., Why a Saw Cuts, Henry Disston
& Sons, Inc, Philadelphia, PA, 1916
Disston Saw, Tool and File Manual, How to Sharpen
a Hand Saw, Henry Disston & Sons, Inc, Philadelphia,
PA, 1952
Grimshaw, Robert, Saw Filing and Management of Saws,
The Norman Henley Publsihing Co., 132 Nassau St, NY, NY, 1912
Holly, H.W., The Art of Saw-Filing, John Wiley,
535 Broadway, NY, NY, 1864
Paquin, Jules, Sharpening Saw--Principles, Procedures
and Gadgets, Fine Woodworking Magazine, May 1980
Payson, Harold, Keeping the Cutting Edge: Setting
and Sharpening Hand and Power Saws, WoodenBoat Publications,
Naskeag Road, Brooklin, ME, 1988
Taintor, C.C., Suggestions on The Care of Saws, Taintor
Manufacturing Company, 113 Chamber Street, NY, NY, 1908