So you want to take down a fat boy, that is, disassemble it. You may have one you have purchased off Ebay which is a basket case and need cleaned, you may have one you own that you want to replate.
Whatever the reason, you get caught up somewhere along the way. This guide will hopefully lend some assistance. While the learning curve is not steep, if you use a heavy hand or don't know what you are doing, you can ruin an otherwise good razor.
Use caution!
Remember, your razor is made out of brass, and it's relatively soft.
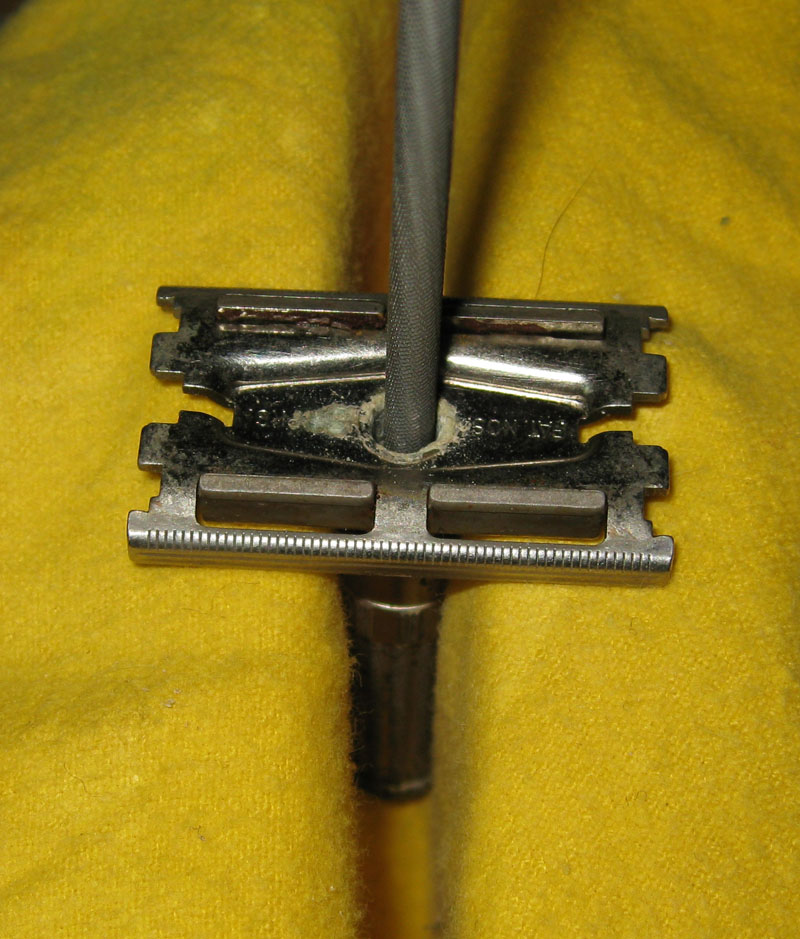
Hopefully, the razor you want to take apart looks like the one to the right. The date code says E1, so it's a prime target from the first quarter of 1959.
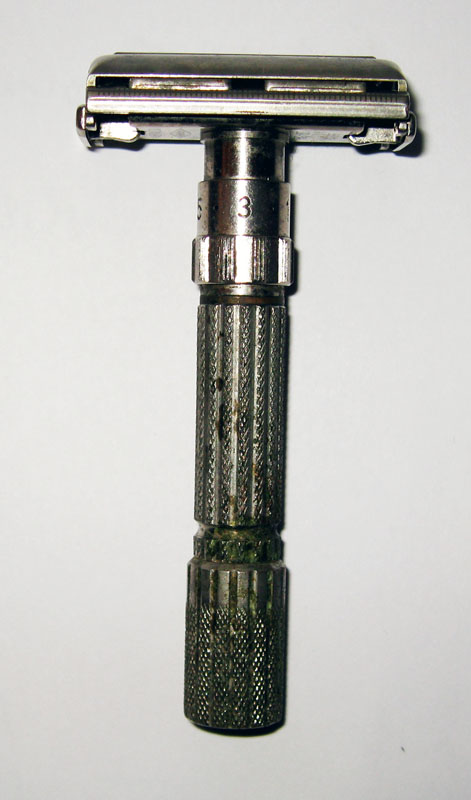
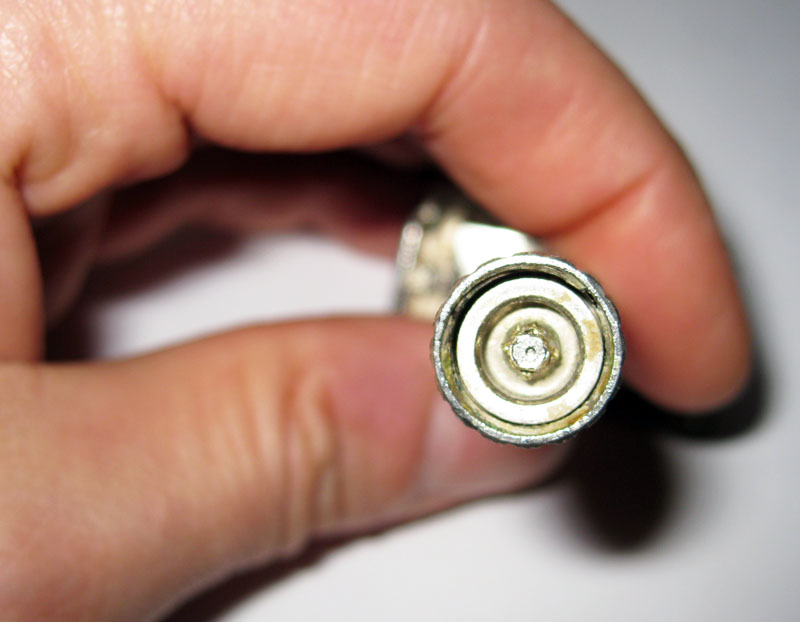
Hopefully the razor you want to take apart looks like the one on the end below. Notice the two little indents on either side of the disk which holds it together.
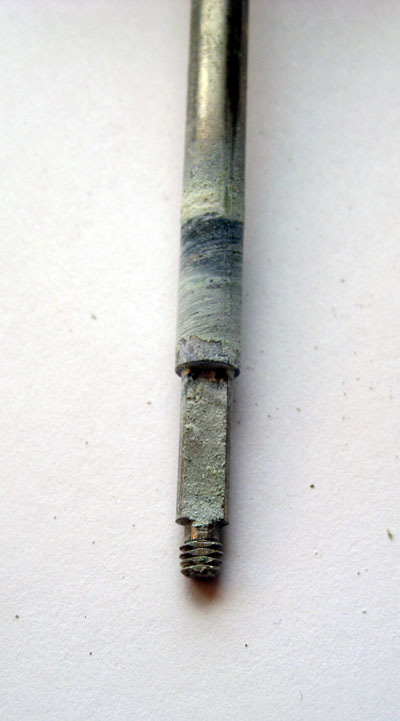
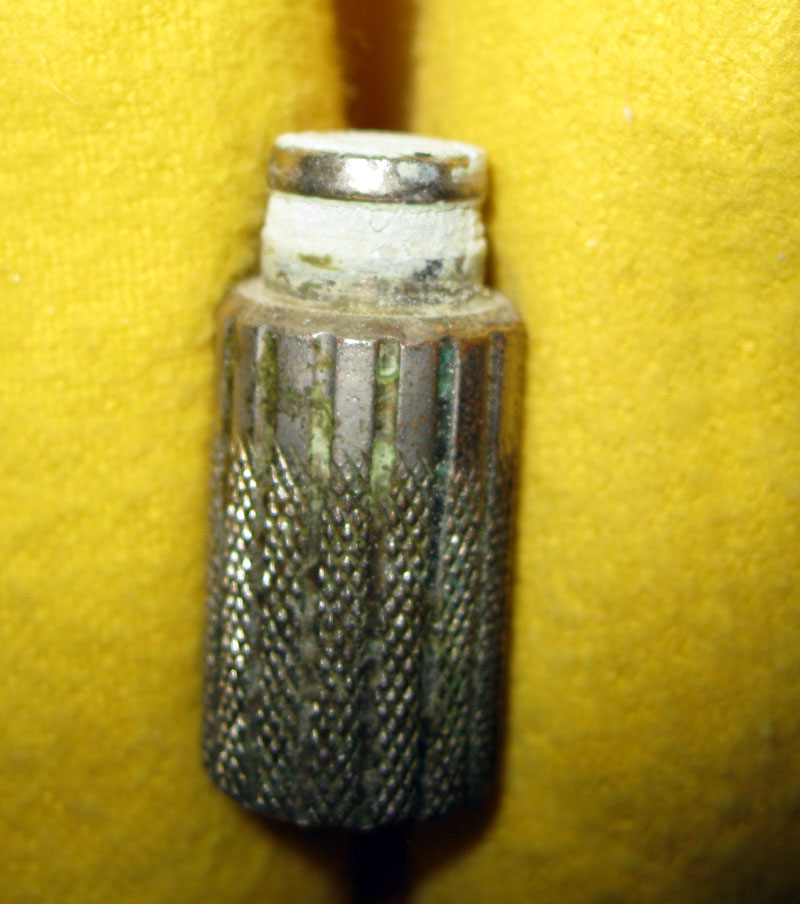
If, unfortunately, the razor looks like the one immediately below, you won't be able to take it apart without damaging it or causing you to have to make a new end cap. It's not difficult to do that...a few minutes at the lathe and some time with a die and tap, but unless you have those kind of tools, you can't really get it back together after you take it apart. The end cap is pressed on the shaft. If you did want to take it off, you could drill to small holes on either side of the shaft and reach in with a stout wire and pull it off. After that the directions should be the same.
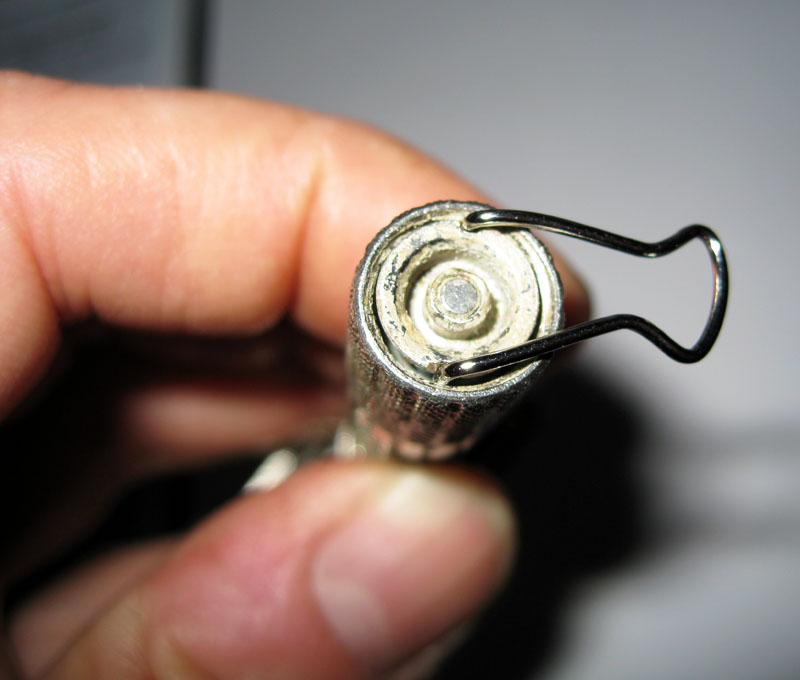
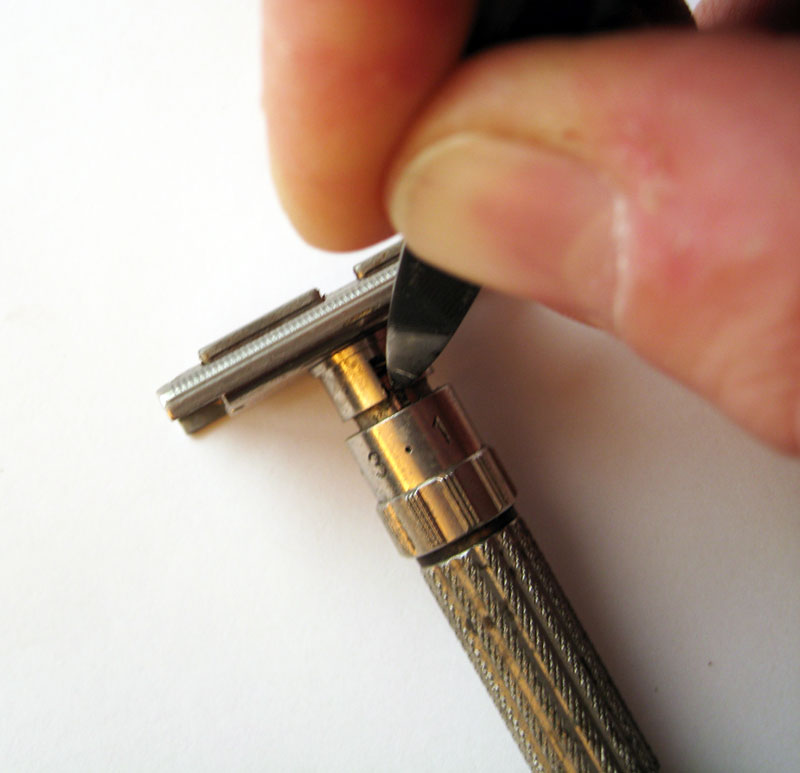
So, let's get to it. You will have to make a tool to take apart your razor. The best thing to use to engage the two little holes on the shaft is the wire handle from the smallest size of bull dog clip. The body on the one I'm thinking of is just 1/2" long. Take one of the handles off by pressing it together, and then with a pair of needle nose pliers, bend the two ends 90 degrees so they point down. That's it! All that remains is to press it into the detents with one finger while at the same time unscrewing it. It might be a little stiff to start, if so it's probably the crud which is accumulated around it. Also remember there is a spring behind it pushing on it.
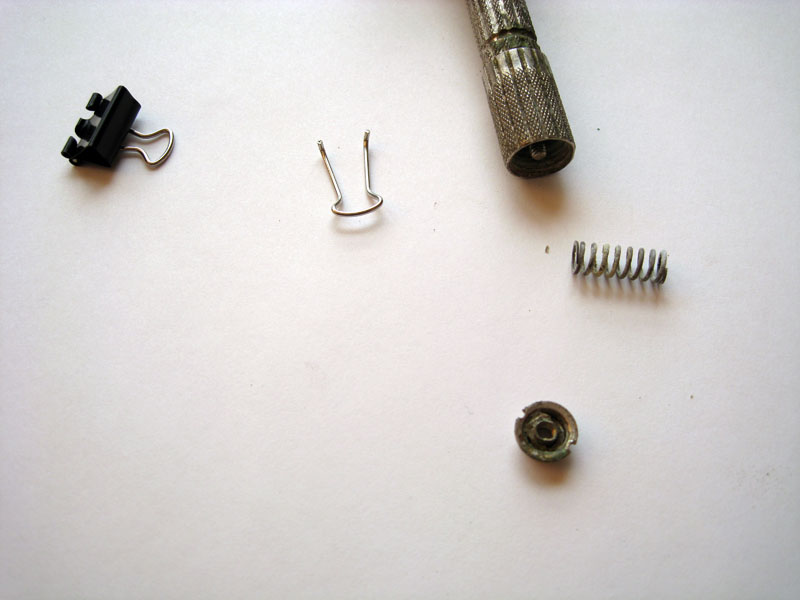
After a couple turns, the disk will come off and you will be able to take out the spring behind it. You should have something that looks like the picture below with lots of crud that probably came along with it. Note the business end of the tool and the remaining clip.
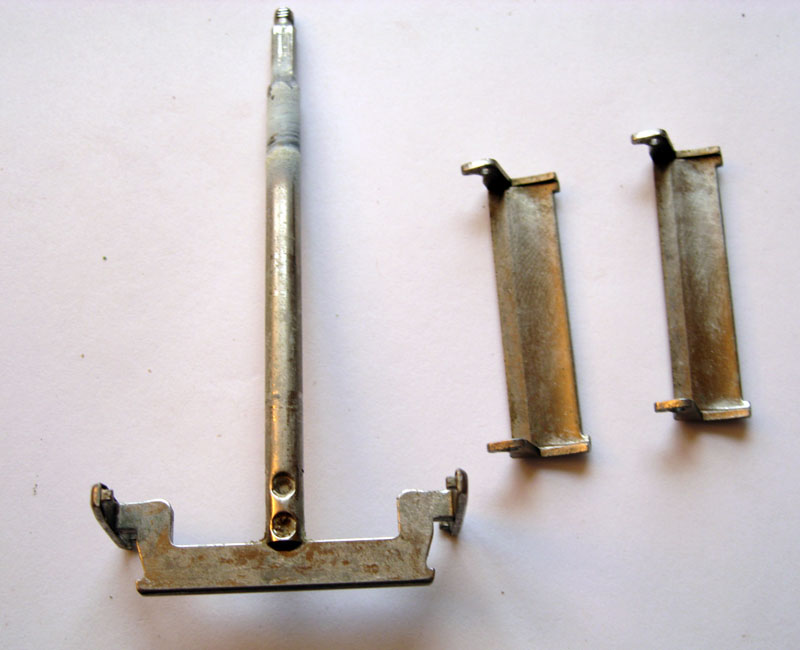
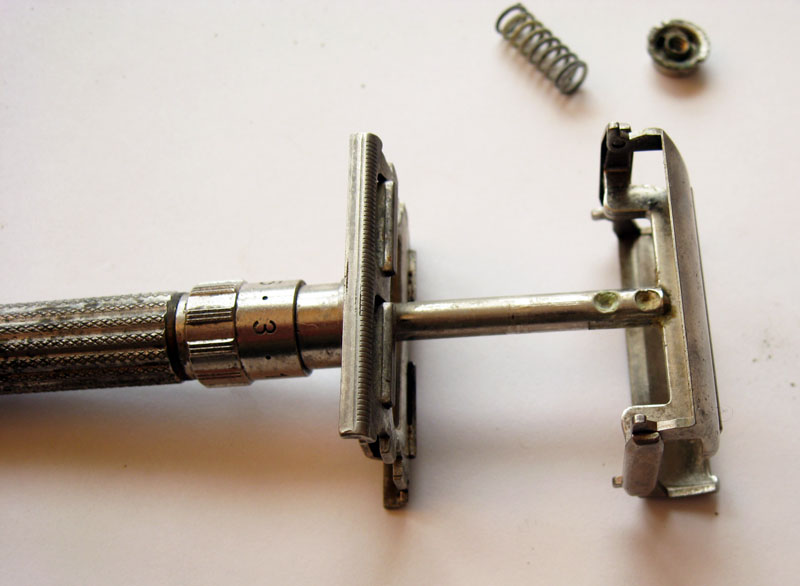
Next, we can pull out the rod which holds the silo doors. The fit on some of these is pretty tight, so you may have to tug on it. Because the assembly is relatively fragile, don't use a punch or anything to remove it. Usually it releases with a good tug. Grasp the end caps if you can...but whatever you do, don't pull on the silo doors. If you are successful, once it is started out you will be on the way. Notice how the rod is riveted to the head which contains the silo doors. This can't take a lot of torque side to side, so be careful. As a side note, if this is racked, that is if there is not a 90 degree angle on each side of the rod as it meets the head, this is the reason that the blade opening is not consistent. You can straighten it out, but you should do it with the razor completely reassembled minus the silo doors. Just wrap it on a wood block on the high side. Put the doors back on and inspect. If it's not quite straight, repeat the process until it is. Don't bend it out of the razor, it will break...trust me.
Next, we need to get the dial which adjusts the blade opening dialed down as far as it will go. This is important as it takes the pressure off the red spring which is inside the razor. The reason this spring exists is poorly understood. The sole purpose of the spring is to limit the dial to between 1 and 9 and to provide the nice "click" you hear as you rotate it. You want it to be as far down the razor barrel as you can. That means rotate it to the 9. Then, with something pointy, push in the red spring until you get it past the 1 again. Then you can rotate it to the 9 where it will again stop. Repeat this until it won't rotate anymore. In the shot below I'm using the end of a nail file. Anything will work, the spring isn't very stout and is easily compressed. You will need to hold it in your hand while you press it so you can rotate the dial at the same time.
When you are done, the razor should have a healthy gap and look like the picture below.
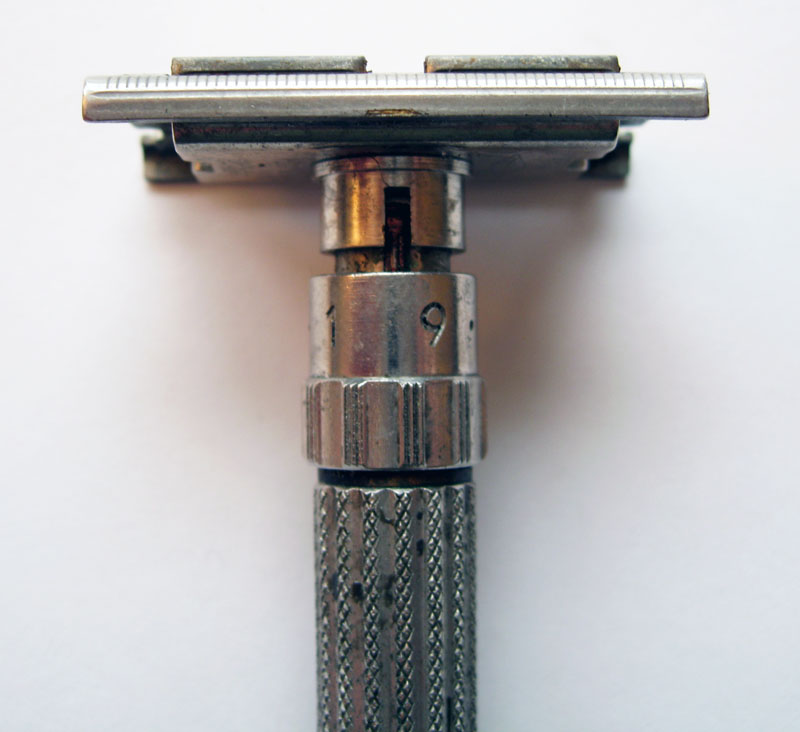
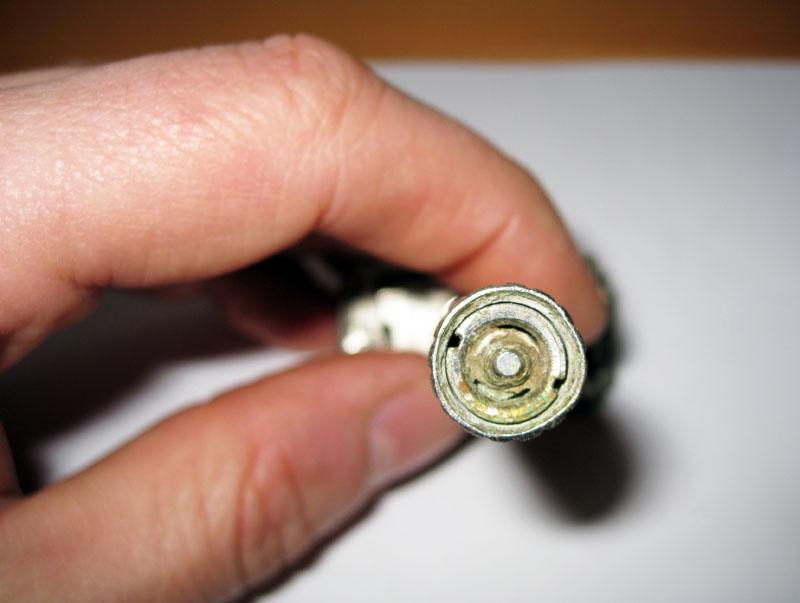
If you are with me so far, this was the easy part. Many have come this far, but have not been able to figure out how to get it the rest of the way off. Some think that the red spring is what is holding it together. Trust me, that is the least of your worries and has nothing to do with it. Before we go further, let me describe what should happen if you are lucky. If you grasp the head in one hand and hold the barrel in the other and twist the head back and forth and pull at the same time, it should come right apart. This happens about 2 times in 10 and usually only if the razor is pretty clean. Typically however, the razor is frozen together. You can try to boil it to loosen the crud, but in my experience that doesn't usually do much except make it too hot to handle. Before you try to rotate the head and see if you can get it apart, look at the picture below. The head has a rod which is being gripped by a collet in the razor body. As you try to rotate, keep an eye peeled at where the rod is pressed into the flat blade platform. If you really use a heavy hand, you can break the bond between the two parts and it will freely rotate. If you see the end of the rod not moving but the head moving, you should stop because all you are doing is rotating the blade platform on the rod which it is pressed onto. If you can't budge it at all, or it starts to rotate, you will need to move on to the next step.
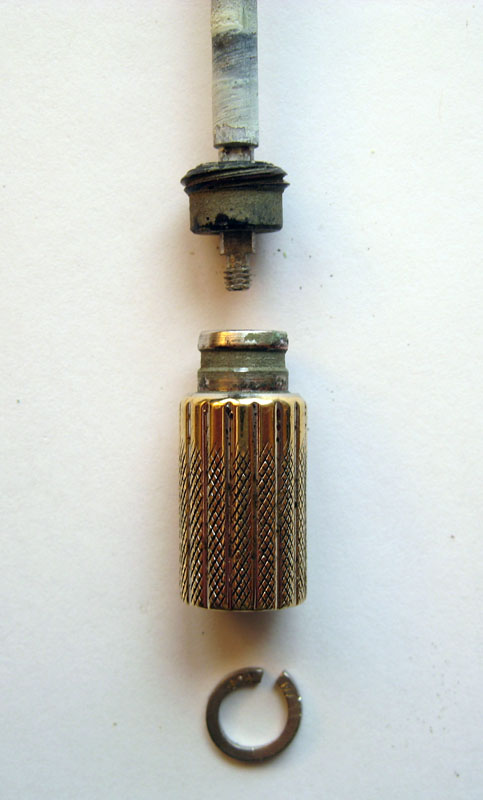
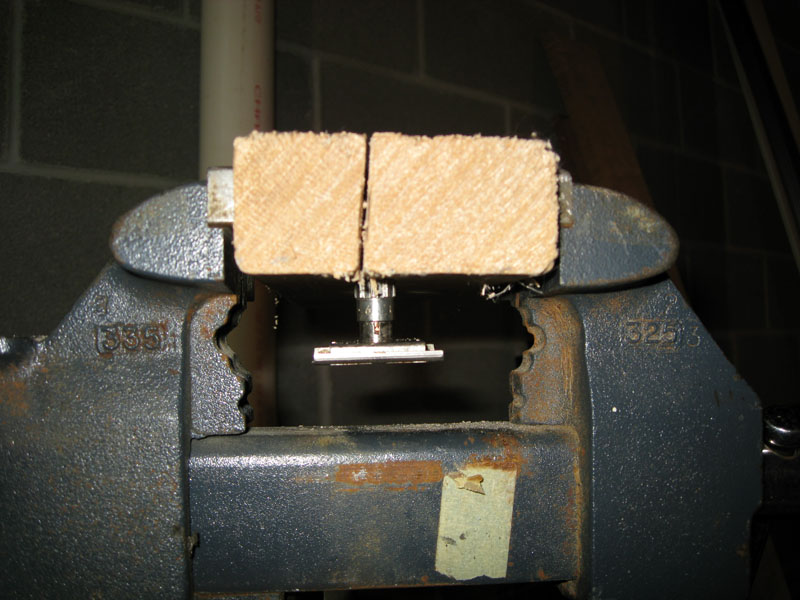
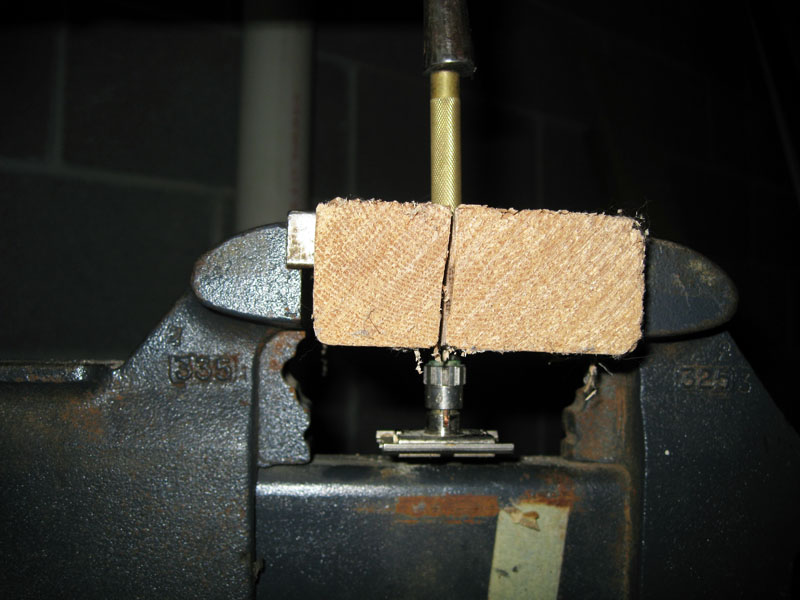
Ok, better strap in because there is some heavy lifting ahead. The first step it to remove the knob which you grasp to tighten the doors at the end of the razor barrel. To do this you will need to find something stout and long. I like to use a chain saw file as it's tough. If you go this route, be careful to hit it only on the very end as it could shatter. The end knob is pressed on. To get it off, I take some cloth to pad the jaws of a vise which are opened just wide enough for the barrel to pass through. If you set it up like I am showing below, the cloth will catch the knob when it pops off.
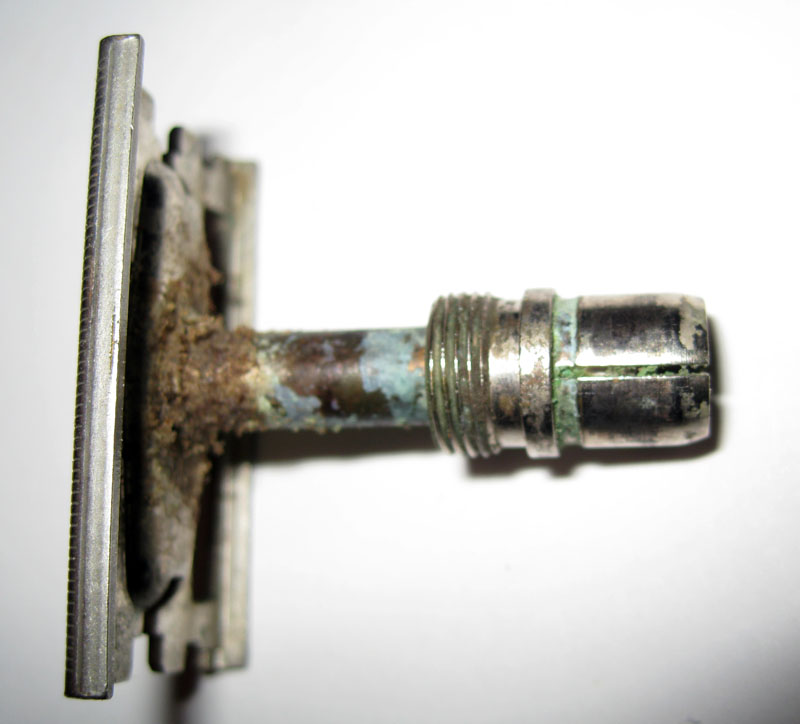
Below is the knob. You can see that it is nicely encrusted. To get it back on, just expand the jaws of your vise and slowly tighten them to press it back together. Put some wood between the razor barrel and the vise jaws or you will damage the finish.
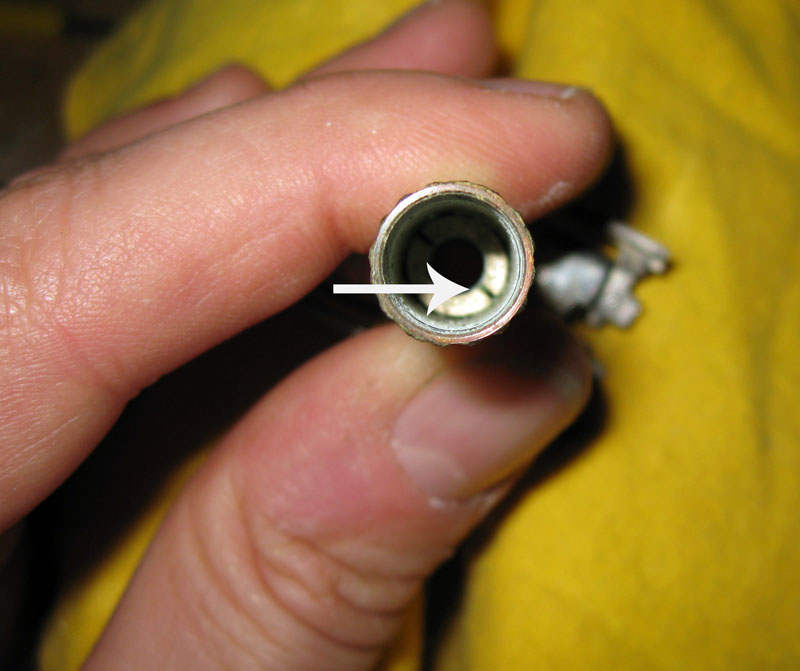
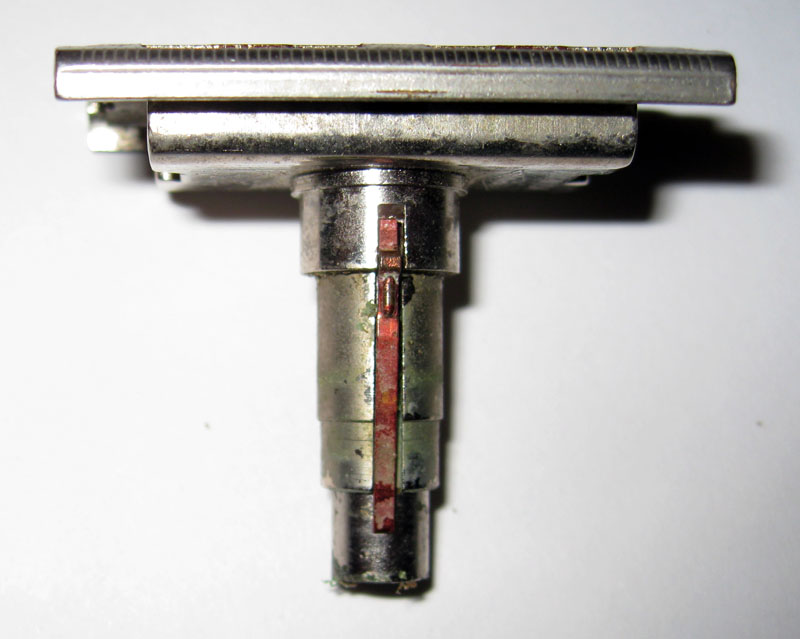
Next, we really have a dilemma. If you look carefully at the picture below, you will see that there is a steel collet which is pressed into the barrel from the other end. If the razor wasn't corroded inside the barrel, the resistance of the collect against the rod in the blade platform is just enough to keep it together. Unfortunately, this isn't the case on this razor. The slit that you see is the bottom of the collect.
Ironically, to get the collect and the head it is holding out of there, we will need to create a collet of our own. Essentially we need to figure out a way to hold the barrel of the razor without damaging it while we drive the head assembly off. Absolutely DON'T be tempted to grab the barrel with the flat jaws of the vise. All you will do is tear up the knurling and collapse the barrel. Instead, take a 8" long piece of 2X4 and drill a 1/2" hole about 2" from the end. Next, take a saw of some sort (I used a 1870 Disston #7 rip saw, but that is another story) and cut from the end, through the hole and past it about 2 inches. Next, slip the razor through it, put it between the vise jaws and tighten it until it won't move. The knurling on the barrel is actually our friend here. Only tighten it as much as you need to.
Next, with a punch (I'm using a brass drift here, you could probably even use a wood dowel if you have one) wrap the end of the collet until it pops free. It shouldn't take a lot of force...but it won't be easy either. Use light blows until the head comes free. You can see in the picture below the nasty, green corroded side of the collet starting to come out.
"There's some lovely filth down here Dennis!" The evil head, finally removed. Notice the red spring...I think you will agree it's not holding anything much. It's all down hill from here. Just unloosen the vise jaws and the barrel will drop right out. Be careful when you initially remove the head assembly, that little spring is very hard to see once it drops to the floor. BTW, the next time you see an ad on Ebay stating that they "sterilize" their razors remember the picture below. After looking at the pictures, ask yourself just how sanitary you could get it without taking it apart!

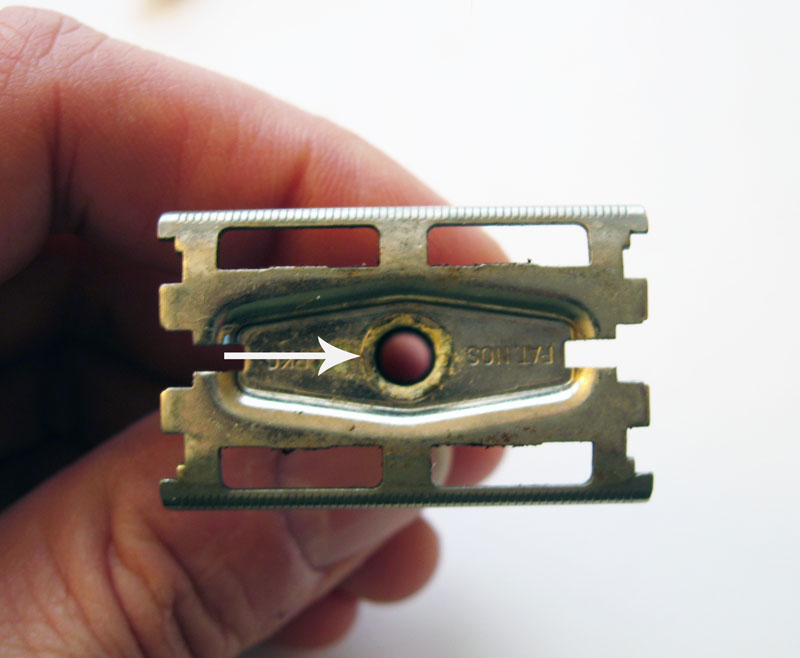
The picture below shows the relationship of the rod on the blade platform to the collet which sits inside the barrel. The rod is just very slightly oversize so when it is pushed into the collet, the wings expand and push against the barrel wall, locking it in place. When the whole assembly is cleaned, you can easily remove the head from the collet without the histrionics we had to go through above.
Since it is an important point, see the picture below as well. Notice how in this case the collet is nickel plated. In some examples I have taken apart, the collet is actually blued like a gun barrel. On some razors, this is the dark ring that you can see when the blade gap adjustment knob is at the lowest setting.

Notice in the picture below the relationship of the spring to the two components which make up the razor head. It simply lays in groove created by the piece that pushes up on the blade. While we are on the topic of the spring, a word of caution. It should have an arced bow in it. If when you reassemble it there is no longer a "clicking" sound, very, very gently take your fingers and put a bow back in it. Be very careful! The spring it very brittle and it can break. Use your finger of one hand to support the spring as you bend it. You want to focus on the tail, not the part where there is the embossed ridge which actually makes the "click" sound. If you break this part, you will have an infinitely adjustable fat boy. Additionally, when you put it back together, run the numbered collar all the way to the bottom. Once it's together, use something sharp to get it up to the range where it should be adjusting. There are at least three revolutions on most razors.
The last step is to remove the silo doors from the razor head. This is pretty easy. Just lift with the thumbnail of one hand on the bracket that holds the door while at the same time pushing down on the door. The doors float between two pins on the head. They come on and off quite easily.